
Upload offline partner spreadsheets
Although a direct connection provides the highest value, you can immediately identify new joint opportunities by uploading customer and / or prospect spreadsheets shared by your partners. Manual spreadsheet uploads offer immense value if you are a new PartnerTap user not yet ready for real-time sharing, or if your partners have not yet joined PartnerTap.
Prepare the spreadsheet
Offline partner spreadsheets must meet these six requirements before upload:
- The file must be a .csv. Multi-tab workbooks must be saved as separate .csv files.
- The file must include at minimum two columns: Account Name and Account Type. Account Type must be set to Customer or Prospect for every row.
Note: If your partner shared a list saying “These are my current customers,” when uploading the spreadsheet through the wizard, make sure to set the Account Type to “SET ALL TO CUSTOMER.” It is okay to have sheets with only customers, only prospects, or both in one file, as long as each account is assigned appropriately.
- Every column header must have a name.
- Delete the 10-15 columns following the last column with data to avoid upload errors caused by random values in those cells.
- Include as much account detail as possible to improve match results.
- Do not include any personally identifiable information.
For column formatting guidance, review the CSV Guide (opens in a new tab) and download the Sample Sheet (opens in a new tab).
Upload the spreadsheet
- Click Partners in the left sidebar.
- Click Offline Partners.
- Navigate to the Uploads tab.
- Add your partner’s .csv file by drag and drop or by clicking Select CSV File.
- Select the Partner Org to associate this list to. Click into the dropdown and start typing the org name to search. If the org does not exist yet, select New Partner Org to add it. To keep this sheet visible only to you and not shared with your org, select Visible Only to Me from the same dropdown.
- Edit the file name so that it includes your partner’s name and a description of the data. Click Upload.
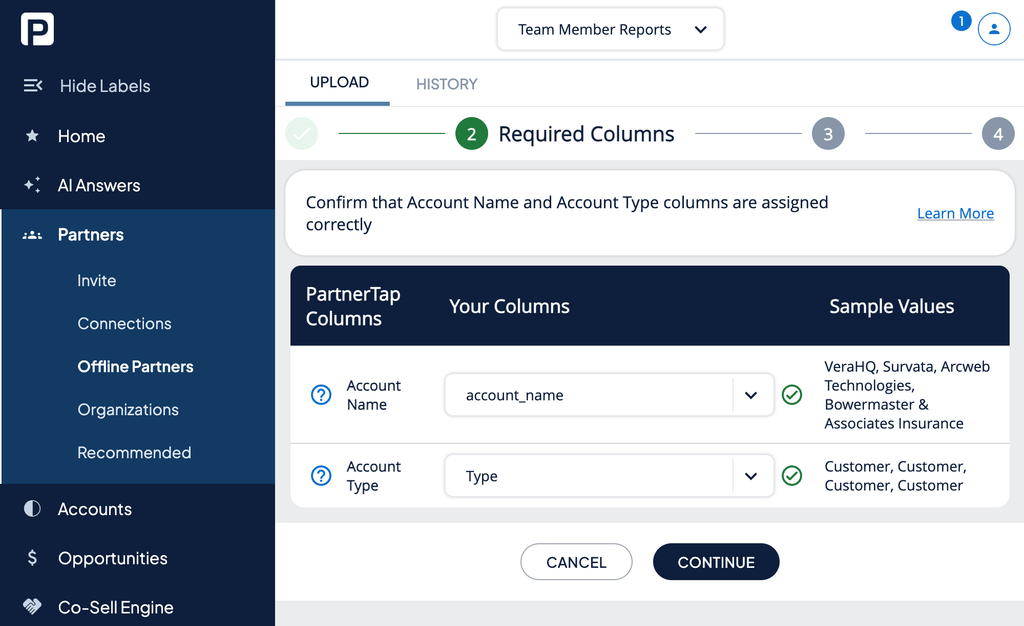
- PartnerTap will map the columns from your file to its standard columns. Columns that map successfully show a green checkmark. Review the sample data to confirm the mapping is correct, and use the dropdown menus to adjust any column that needs to be remapped. Click Continue.
- Select any additional custom columns to include. These are not used in account mapping but improve reporting and list filtering. Click Upload.
- PartnerTap will notify you by email when the upload is complete.
- To add another sheet, click Add Another Sheet and repeat steps 4 through 8.
Review your upload history
To see all uploaded sheets and their status, go to Partners > Offline Partners > History tab. Each sheet shows the partner org it is associated with, the upload date, and the number of accounts (records) included.
Want to scale?
See the leading multi-partner co-selling platform.
Invited by a partner?
Sign up for a free PartnerTap account.